
In this guide, we will show you how to install Odoo 13 on Ubuntu 20.04. ![]() Odoo, also known as OpenERP, is a free and open-source ERP platform. It’s one of the most popular ERP platforms available thanks to its customizability and flexibility. Written in the Python programming language, Odoo is used for many business applications, including sales pipeline, project management, CRM, invoicing, accounting, inventory, and much more. Odoo comes built-in with a plethora of features that are an excellent fit for most business use cases. However, if you need something more specific, Odoo also comes with a vast library of custom add-ons which allows you to adjust the features of Odoo to fit your exact business needs.
Odoo, also known as OpenERP, is a free and open-source ERP platform. It’s one of the most popular ERP platforms available thanks to its customizability and flexibility. Written in the Python programming language, Odoo is used for many business applications, including sales pipeline, project management, CRM, invoicing, accounting, inventory, and much more. Odoo comes built-in with a plethora of features that are an excellent fit for most business use cases. However, if you need something more specific, Odoo also comes with a vast library of custom add-ons which allows you to adjust the features of Odoo to fit your exact business needs.
Table of Contents
1. Log in and Update the Server:
Log in to your Ubuntu 20.04 VPS via SSH as user root (You can use a superuser account if root is not available. Our VPSes come with root access included):
ssh root@IP_Address -p Port_number
Don’t forget to replace ‘IP_Address’ and ‘Port_number’ with the actual IP address of your server and the SSH service port. The default SSH port is 22.
Next, let’s make sure that we’re on Ubuntu 20.04. You can do that like this:
# lsb_release -a
You should get this as the output:
Distributor ID: Ubuntu
Description:    Ubuntu 20.04 LTS
Release:        20.04
Codename:       focal
Run the following commands to make sure that all installed packages on your Ubuntu 20.04 VPS are updated to their latest available versions:
apt update && apt upgrade
2. Installing Necessary OS Related Packages
Run this command to install all of the necessary packages. These packages, such as Python and Node.js, are all required in order for Odoo to function correctly.
apt-get install python3-venv build-essential python3-pillow python3-lxml python3-dev python3-pip python3-setuptools npm nodejs git gdebi libldap2-dev libsasl2-dev libxml2-dev libxslt1-dev libjpeg-dev libpq-dev -y
When that finishes, we will move on to creating a new user account for Odoo.
3. Create a System User
Next, we will need to create a new system user to run Odoo. You can create a new user with named odoo with the home directory set to /opt/odoo using the following command:
useradd -m -U -r -d /opt/odoo -s /bin/bash odoo
4. Install PostgreSQL server
The next step is to install the PostgreSQL database system on your Ubuntu 20.04 VPS. This step is fairly simple, just run the following command:
apt-get install postgresql
It will install the PostgreSQL database server and other required tools.
To check and verify that the PostgreSQL server is installed, you can use the following command:
psql --version
Running that will show you the current version of PostgreSQL that you have installed:
# psql --version
psql (PostgreSQL) 12.2 (Ubuntu 12.2-4)
After the installation is complete, make sure to enable the PostgreSQL server to start automatically upon server reboot through systemctl:
systemctl enable postgresql
Also, we need to create a PostgreSQL user with the same name as the new system user. Run the following command to create a PostgreSQL user:
su - postgres -c "createuser -s odoo"
5. Install ‘wkhtmltopdf’
Odoo requires the wkhtmltopdf package, which is an open-source tool that converts the HTML format to PDF so that Odoo can print PDF reports. The recommended version for Odoo is 0.12.5 with patched qt, which is the latest version at the time this tutorial was written. We will download and install it with the following commands:
wget https://github.com/wkhtmltopdf/wkhtmltopdf/releases/download/0.12.5/wkhtmltox_0.12.5-1.bionic_amd64.deb
apt install ./wkhtmltox_0.12.5-1.bionic_amd64.deb
Verify that wkhtmltopdf is installed on your server:
# wkhtmltopdf --version
wkhtmltopdf 0.12.5 (with patched qt)
6. Install and Configure Odoo 13
In this section, we will download Odoo 13 from the Git repository and install it in a Python virtual environment.
First, log in as odoo user and download Odoo 13 from the Git repository:
su - odoo
git clone https://www.github.com/odoo/odoo --depth 1 --branch 13.0 /opt/odoo/odoo13
Once the download is complete, create a new Python virtual environment for the Odoo 13 installation with the following command:
cd /opt/odoo && python3 -m venv odoo13-venv
Next, activate the virtual environment with the following command:
source odoo13-venv/bin/activate
Next, install the required modules using the pip3 command as shown below:
(odoo13-venv) $ pip3 install wheel
(odoo13-venv) $ pip3 install -r odoo13/requirements.txt
Once all the required modules are installed successfully, deactivate the virtual environment and switch back to the sudo or root user with the following command:
(odoo13-venv) $ deactivate && exit
Next, create a separate directory for Odoo custom addons. The best practice is to install custom Odoo modules in a separate directory. This ensures that if some custom module doesn’t work, it can easily be removed without risking the removal of required/built-in modules.
mkdir /opt/odoo/odoo13-custom-addons
chown odoo: /opt/odoo/odoo13-custom-addons
The following commands will create a log file for the new Odoo installation:
mkdir /var/log/odoo && touch /var/log/odoo/odoo.log
chown -R odoo: /var/log/odoo/
Next, open the file /etc/odoo.conf with nano editor: nano /etc/odoo.conf
With the file open, enter the following information in it:
[options]
; This is the password that allows database operations:
admin_passwd = master_password
db_host = False
db_port = False
db_user = odoo
db_password = False
xmlrpc_port = 8069
; longpolling_port = 8072
logfile = /var/log/odoo/odoo.log
logrotate = True
addons_path = /opt/odoo/odoo13/addons,/opt/odoo/odoo13-custom-addons
Make sure you set master_password to something that is strong and difficult to guess. Save and close the file.
The last thing we need to do is to create a systemd unit file which will be used to run our Odoo instance as a service.
Create a new odoo.service file:
nano /etc/systemd/system/odoo.service
and enter the following configuration:
[Unit]
Description=Odoo13
#Requires=postgresql-12.2.service
#After=network.target postgresql-12.2.service

[Service]
Type=simple
SyslogIdentifier=odoo13
PermissionsStartOnly=true
User=odoo
Group=odoo
ExecStart=/opt/odoo/odoo13-venv/bin/python3 /opt/odoo/odoo13/odoo-bin -c /etc/odoo.conf
StandardOutput=journal+console

[Install]
WantedBy=multi-user.target
Once the file is saved and closed, we will reload the daemon so that it acknowledges the newly created unit in systemd.
systemctl daemon-reload
Next, start the newly-created odoo.service and enable it to start after system reboot with the following command:
systemctl start odoo
systemctl enable odoo
7. Access the Odoo Instance
Now when you know that the fresh Odoo installation is active and running on the server, you can access it by navigating your server IP address along with the Odoo port number. In this case, our installed Odoo uses the default port 8069 (as defined in our Odoo configuration file):
http://<your_server_IP_address>:8069
If the installation has been successfully completed, you will be able to see the Odoo screen as shown below and create your first database:
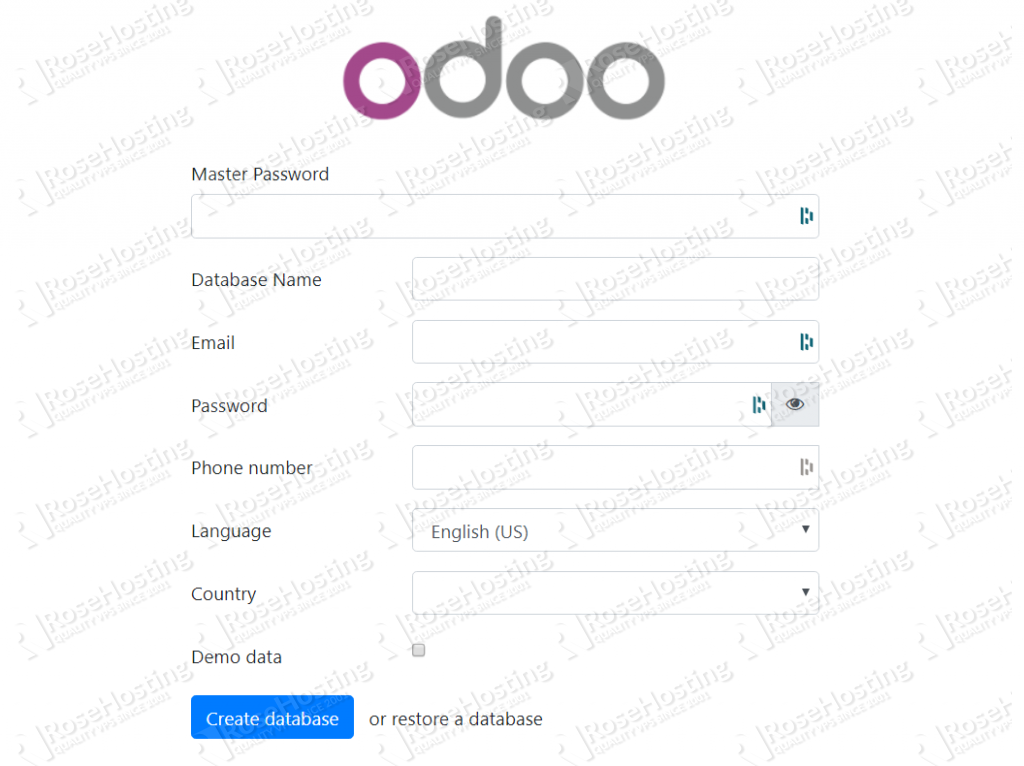 From here, you simply enter your master password and fill out the fields with the information that you need for your use case. That’s it! Odoo is now successfully up and running on your Ubuntu 20.04 VPS.
![]() Of course, you don’t have to install Odoo 13 on Ubuntu 20.04 if you use one of our Odoo VPS Hosting services, in which case you can simply ask our expert Linux admins to install and configure Odoo 13 on Ubuntu 20.04 for you. They are available 24×7 and will take care of your request immediately.
Of course, you don’t have to install Odoo 13 on Ubuntu 20.04 if you use one of our Odoo VPS Hosting services, in which case you can simply ask our expert Linux admins to install and configure Odoo 13 on Ubuntu 20.04 for you. They are available 24×7 and will take care of your request immediately.
PS. If you liked this post on how to install Odoo 13 on Ubuntu 20.04, please share it with your friends on the social networks using the buttons below or simply leave a reply. Thank you.
i used the above instruction, but odoo not working
(odoo13-venv) $ pip3 install -r odoo13/requirements.txt
after executing this instruction got many errors
What are the errors you are getting?
Can we install mulitple instances using Odoo 13? How to do that?
Yes, you can install multiple Odoo instances as long as your server has enough resources, like CPU, RAM, and disk space.
I also got errors when I execute:
(odoo13-venv) $ pip3 install -r odoo13/requirements.txt
-> Building wheel for psycopg2 (setup.py) … error
ERROR: Failed building wheel for psycopg2
It seems a very common error in Ubuntu 20.04 but I can’t fix it
Please try to run the following commands:
pip3 uninstall psycopg2
pip3 list –outdated
pip3 install –upgrade wheel
pip3 install –upgrade setuptools
pip3 install psycopg2
I ran into the same psycopg2 issue, apt-get install libpq-dev fixed it.
We have updated the post. Thanks.
In “Step #2” adding libpg-dev package allowed psycopg2 to install correctly during “Step#6”. So the entire command should be:
apt-get install python3-venv build-essential python3-pillow python3-lxml python3-dev python3-pip python3-setuptools npm nodejs git gdebi libldap2-dev libsasl2-dev libxml2-dev libxslt1-dev libjpeg-dev libpq-dev -y
Thank you so much for this helpfull tuto, but Odoo service does not start automatically, we need to correct these two lines:
systemctl start odoo
systemctl enable odoo
In :
systemctl start odoo.service
systemctl enable odoo.service
and it’s should work or start correctly the odoo service.
Using both commands: systemctl start odoo and systemctl start odoo.service should work the same.
what is the password when creating the odoo user?
You can set password to “odoo” user with the following command in the console: passwd odoo
And you will have to enter the password twice.
i have trouble with this script
cd /opt/odoo && python3 -m venv odoo13-venv
in my screen show this error
The virtual environment was not created successfully because ensurepip is not
available. On Debian/Ubuntu systems, you need to install the python3-venv
package using the following command.
apt install python3.8-venv
You may need to use sudo with that command. After installing the python3-venv
package, recreate your virtual environment.
Failing command: [‘/opt/odoo/odoo13-venv/bin/python3’, ‘-Im’, ‘ensurepip’, ‘–upgrade’, ‘–default-pip’]
can you help me for this solution?
You need to install first the prerequisites, as explained above. Also, please make sure that you have SSH root access or a system user with sudo privileges.
Try to install the Python virtual environment with the following command: sudo apt-get install python3-venv